Preparedness
Food Storage Basics: Maximizing Shelf Life and Nutrition

Now, let’s get down to brass tacks. If there’s one thing I’ve learned from my time in the wild, it’s this: food, along with water and shelter, is a fundamental pillar of survival. But it’s not just about having food; it’s about storing it right to maximize shelf life and nutrition.
When it comes to food storage, the first rule of thumb is to choose the right kind of food. Non-perishable items, such as canned goods, dried fruits, nuts, and grains, are your best bet. These bad boys can last for months, sometimes even years, without refrigeration. Just make sure to keep them in a cool, dry place away from sunlight.
Now, let’s talk about packaging. Oxygen absorbers are a great way to keep your food fresh for longer. These little packets remove oxygen from the storage container, slowing down oxidation and keeping those pesky bugs and bacteria at bay. Vacuum sealing is another excellent method. By removing air from the package, you can extend the shelf life of your food by up to five times.
But what about nutrition, you ask? Well, it’s no secret that over time, stored food can lose its nutritional value. The key here is rotation. Don’t just store your food and forget about it. Use it, replace it, and keep it moving. This way, you’re always eating the oldest items in your stockpile first, ensuring that you’re getting the most nutritional bang for your buck.
Freezing
Freezing is another method to preserve both shelf life and nutrition. Many fruits, vegetables, and meats can be frozen for extended periods without losing their nutritional value. However, remember that freezing only slows down spoilage; it doesn’t stop it. So, keep an eye on those expiration dates.
Dehydrating
Dehydrating is an age-old preservation method that works wonders. By removing water from your food, you inhibit the growth of bacteria, extending shelf life significantly. Plus, dehydrated foods maintain most of their nutritional value and can be rehydrated with a bit of water.
Canning
Canning is another tried-and-true method. It’s a bit more labor-intensive, but it can really pay off. By sealing food in airtight containers and heating them to kill bacteria, you can store canned goods for years. And the best part? Most of the nutrients are preserved, making canned food a nutritious option.
Freeze-drying
Now, for those of you who prefer a more high-tech approach, there’s freeze-drying. This process involves freezing the food and then reducing the surrounding pressure to allow the frozen water to sublimate directly from the solid to the gas phase. The result? Food that can last for years and retains most of its nutritional value.
Remember, folks, food storage is not a one-size-fits-all deal. The best method for you depends on your needs, resources, and circumstances. Experiment with different methods and find what works best for you.
And one last thing: always, always check your stored food before eating. Look for signs of spoilage like mold, off smells, or bulging cans. No matter how well you store your food, safety should always be your top priority.
So, there you have it. With a bit of knowledge and some careful planning, you can maximize both the shelf life and nutrition of your stored food. Because in the wild, it’s not just about surviving; it’s about thriving. And believe me, with the right food storage, you’ll be doing just that.

When winter storms strike, power outages can be a common, albeit inconvenient, occurrence. However, with a bit of foresight and preparation, you can mitigate the discomfort of these short-term disruptions. The key is to have a plan in place before the lights go out, ensuring that you’re not left scrambling in the dark for essentials like light sources, heat, and food.
A well-prepared “blackout” kit is your first line of defense against the chaos of a power outage. This kit, which can be stored in a bag or tote, should be easily accessible even in the dark. While your cell phone’s flashlight might be a handy tool, relying on it can quickly drain your battery. Therefore, it’s crucial to know how to reach your blackout kit without incident.
Light is a primary concern during any power outage. Your kit should include a variety of lighting options, such as flashlights and headlamps for hands-free use, and a lantern for omni-directional illumination. “At least one flashlight and headlamp per person is recommended.” For families with children, glowsticks can add a bit of fun to the situation. If space allows, solar-powered lighting is a sustainable option, though it may not be feasible for apartment dwellers with limited sunlight exposure. Importantly, candles should be avoided due to the fire hazard they pose, as demonstrated by a tragic incident involving an elderly neighbor during an ice storm.
Having extra batteries for all your flashlights is essential. There’s nothing worse than discovering a dead flashlight when you need it most. Aim to store at least one extra set of batteries, or better yet, two. Limiting your devices to one or two battery types can simplify this process. For an added layer of preparedness, consider including a solar charger and rechargeable batteries in your kit.
In addition to lighting, a combustion device like matches, a BBQ lighter, or a simple BIC lighter is useful, especially if you have a gas stove that may require manual ignition. These items are also handy for heating and cooking, which we’ll explore further.
Staying informed during a power outage is crucial, so a battery-operated or wind-up radio should be part of your kit. “A hand-cranked combo unit that gives you light, USB charging plus a radio too would be a good choice.” This not only keeps you updated on the situation but also provides a morale boost by connecting you to the outside world.
For longer outages, heating becomes a priority. Ideally, a wood stove installed beforehand can address both heating and cooking needs, provided you have a wood supply. If that’s not an option, a fireplace can offer some warmth, though it’s less efficient. To conserve heat, close all vents and doors, and minimize trips outside. Selecting a single room, such as a master bedroom, for everyone to gather can also help retain warmth. Block drafts with towels and cover windows or glass doors with plastic sheeting.
Dressing in layers is crucial for maintaining body warmth. “Warm socks that go up above the calf but that aren’t tight are recommended,” and wearing a stocking hat can further reduce heat loss. For families without a suitable room, “camping” in the living room can be an adventurous alternative, complete with tents or blanket forts.
Sleeping bags are invaluable for keeping everyone warm, and if they’re compatible, zipping two together allows for shared body heat. Don’t forget about your pets, who can also contribute to warmth. For pets in cages or aquariums, wrapping their enclosures with blankets can help conserve heat, and a battery-operated heater or bubbler is a wise investment.
While candles can provide some warmth, they should never be used while sleeping. Instead, portable, non-electric space heaters are a safer option. Ensure any propane heaters are rated for indoor use to avoid carbon monoxide buildup, and always maintain proper ventilation. A working carbon monoxide detector is a must when using any combustion-based heating.
Cooking during a power outage requires some creativity. If you have a wood stove, fireplace, or gas range, you’re in luck. Otherwise, a BBQ or camp stove can be used in a well-ventilated area like a garage with the door partially open. It’s critical to avoid using charcoal or kerosene indoors due to the rapid buildup of CO2.
For indoor cooking, a sterno or “canned heat” stove is a safe bet. These canisters burn long enough to prepare simple meals like scrambled eggs or heated soups. Alternatively, a denatured alcohol stove provides clean-burning heat without the risk of gas leaks, though it requires cooling before refueling.
By organizing and storing your supplies in an easily accessible location, you can significantly ease the stress of a short-term power outage. With a bit of planning, you can also expand your preparations for longer-lasting disruptions, ensuring you’re ready for whatever winter throws your way.
Let us know what you think, please share your thoughts in the comments below.

In the vast realm of survival gear, few tools are as indispensable as a good survival knife. It’s the cornerstone of any survival kit, a versatile instrument that can mean the difference between life and death in extreme situations. But with so many options available, how do you choose the right blade for your needs? This guide will walk you through the key considerations in selecting a survival knife that you can rely on when the going gets tough.
First, consider the blade material. Most survival knives are made from either stainless steel or carbon steel. Stainless steel is resistant to rust and corrosion, making it ideal for humid or wet environments. However, it can be harder to sharpen and may not hold its edge as well as carbon steel. Carbon steel, on the other hand, is easier to sharpen and typically holds a sharper edge, but it requires regular maintenance to prevent rust. Your choice should depend on the environment you anticipate being in and your willingness to maintain the blade.
Next, think about the blade design. A full-tang knife, where the blade extends through the handle, offers superior strength and durability compared to partial-tang or rat-tail tang designs. This is crucial when performing tasks that require significant force, such as chopping or prying. The blade shape is also important; a drop-point blade is versatile, suitable for a variety of tasks, from cutting rope to skinning game. A tanto blade, with its reinforced tip, is excellent for piercing and prying but may not be as effective for slicing.
The size of the knife is another important factor. While a larger blade might seem more formidable, it can be cumbersome and difficult to control for detailed tasks. A blade length of 4 to 6 inches is generally considered ideal for a survival knife, offering a balance between functionality and portability. This size allows for effective cutting, carving, and even self-defense while remaining manageable for most users.
Handle material and ergonomics should not be overlooked. A comfortable, non-slip grip is essential for prolonged use, especially in wet or cold conditions. Materials like rubber, micarta, or G-10 provide excellent grip and durability. Ensure the handle fits your hand well and doesn’t cause fatigue or blisters during extended use. A good survival knife should feel like an extension of your hand.
Consider additional features that may enhance the knife’s utility. A serrated edge can be useful for cutting through tough materials like rope or fabric, though it can make the knife harder to sharpen. A built-in fire starter or a sheath with a sharpening stone can add value, but only if they don’t compromise the knife’s primary functions.
Lastly, test the knife if possible. A survival knife is a personal tool, and what works for one person may not work for another. Handling the knife, feeling its balance, and testing its cutting ability can provide insights that specifications alone cannot.
Choosing the right survival knife involves balancing personal preferences with practical needs. By considering factors such as material, design, size, and additional features, you can select a blade that will serve you well in the wild. Remember, your survival knife is more than just a tool; it’s a lifeline, a companion that should be chosen with care and respect for the challenges of the great outdoors.

When it comes to emergency preparedness, having a dependable food supply with a long shelf life is essential. A 25-year shelf life for survival food assures you that the food will remain edible and nutritious for decades, providing sustenance during a crisis.
Achieving such longevity in food storage involves selecting the right food kits and employing effective preservation techniques. It’s crucial to choose high-quality survival food kits that are minimally processed and made with natural ingredients. Look for reputable brands that offer transparent labeling to ensure confidence in your stockpile.
Proper storage is key to maintaining the shelf life of your food. Store your kits in a cool, dark place, ideally between 60-70°F, and use airtight containers like food-grade plastic buckets to protect against moisture and oxygen exposure. Regularly rotate your stock and check for signs of spoilage to maintain safety.
“Freeze-dried meat is considered the ultimate long-term protein source when it comes to survival food.” With a shelf life exceeding 25 years when stored correctly, it surpasses other food types in longevity. Its lightweight nature makes it easy to transport, and rehydrating it is simple when water is available. Freeze-drying retains most nutrients, providing an excellent source of protein, vitamins, and minerals.
Most survival food with a 25-year shelf life utilizes dehydration and freeze-drying methods, reducing moisture exposure. When stored in protective containers, these foods remain edible for decades. Best practices for maximizing shelf life include using oxygen absorber packets and storing food in Mylar bags or food-grade buckets.
For those looking to store food for even longer periods, options like wheat, white rice, dried beans, oats, and pasta are excellent choices, capable of lasting 30 years or more with proper storage. The key is to keep these foods sealed airtight in a cool, dark environment and to avoid temperature fluctuations.
Preserving food with a 25-year shelf life involves careful planning. Mylar bags with oxygen absorbers are effective for blocking light and removing oxygen, preventing oxidation and bacterial growth. Regularly inspect stored food for spoilage and rotate stock using the first-in, first-out method to ensure freshness.
When selecting emergency food kits, prioritize taste, nutrition, and ingredient quality. Look for meals that retain flavor and texture through preservation methods like freeze-drying. Variety is important to avoid taste fatigue, and ease of preparation is crucial, especially in off-grid scenarios.
Nutritional content is paramount, with a focus on protein, vitamin C, and essential minerals. Ensure the food meets caloric needs, as the average adult requires 1500-2000 calories in survival situations. Favor brands with recognizable ingredients and minimal preservatives.
Cost-effectiveness is also important. Calculate the cost per full day’s worth of food or per calorie to determine value. Bulk purchases and online deals can help build your supply economically. With proper planning and storage, you can ensure a reliable food supply for emergencies without overspending.
Proper storage containers, such as opaque plastic buckets with gasket seals or Mylar bags, are essential for long-term food storage. A cool, dark, and dry environment is ideal, with basements or climate-controlled rooms being excellent options. Organize your stock using the first-in, first-out method to maintain freshness.
In addition to food, ensure you have access to cooking equipment and fuel for meal preparation during emergencies. Proper protocols for long-term storage and preparation will keep your food supply intact and safe for consumption.
For freeze-dried and dehydrated items, follow best practices to maintain quality. Seal items in Mylar bags with oxygen absorbers and store in cool, dark spaces. Rehydrate foods correctly to preserve nutrition and taste. By adhering to these guidelines, your emergency food will remain viable for decades.
Building an emergency food supply requires careful planning and budgeting. Bulk purchases and price tracking services can help you stock up economically. With diligent research and proper storage, you can ensure your family has access to nutritious food with a 25-year shelf life when disaster strikes.
Having a reliable stock of long-lasting emergency food is a crucial part of preparedness. By following best practices for selection, storage, and budgeting, you can keep your family nourished during extended emergencies.
Let us know what you think, please share your thoughts in the comments below.
-

 Tactical1 year ago
70-Year-Old Fends Off Intruder with Lead-Powered Message
-
 Tactical1 year ago
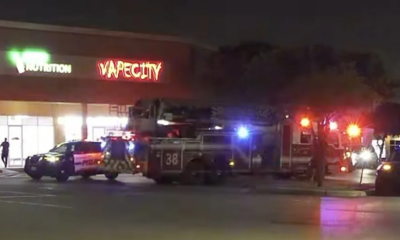
Vape Shop Employee Confronts Armed Crooks, Sends Them Running
-

 Preparedness1 year ago
Ex-Ballerina’s Guilty Verdict Sends Tremors Through Gun-Owner Community
-

 Preparedness12 months ago
Good Samaritan Saves Trooper in Harrowing Interstate Confrontation
-
 Tactical1 year ago
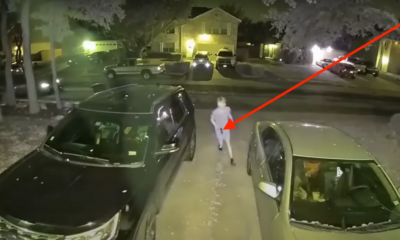
Midnight SUV Theft Interrupted by Armed Homeowner’s Retaliation
-

 Survival Stories2 years ago
Emily’s 30-Day Experience of Being Stranded on a Desert Island
-

 Preparedness1 year ago
Arizona Engineer’s Headless Body Found in Desert: Friend Charged
-

 Preparedness12 months ago
Boy Saves Dad from Bear Attack with One Perfect Shot